
The talking wall: from the cambrian explosion to the holocene extinction


Activity description
The activity involves a set of tasks that students carry out over the course of a school term. It is a project designed to work on the essential learning goals related to the Geological Eras, integrated with topics from subjects such as Physics and Chemistry, Mathematics, Arts, Portuguese, Technology, among others.
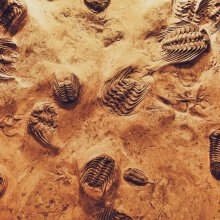
Throughout the tasks, students develop knowledge across various areas and produce content and materials that will be displayed and presented in a final session to the school community. The image illustrates a possible version of the “Talking Wall”.


For biodiesel production:
-
Protocol (see Student Guide)
For the development of different research activities:
-
Computers with internet access
For simulating the fossilization process:
-
3D printer and plastic filament
-
3D fossil model
-
Plaster
-
Water
-
Small-sized toys to use as objects to “fossilize”
For creating the “talking wall”:
-
K-line boards: 2 boards measuring 100 cm × 200 cm, 3 mm thick
-
Craft knives (X-Acto)
-
Scissors
-
Pack of multicolored paper
-
Satin-finish photographic printing paper
-
White Blu-tack
-
Aluminum adhesive tape
-
Spray glue
-
Floor and wall projector
-
Makey Makey
-
Copper wire
-
Wall buttons (produced/designed)
-
QR codes
-
Scratch program to play audio produced by the students
For video production:
-
Green screen
-
Video camera
-
Video editing software
-
Background images related to the Eon, Eras, and Epoch
The importance of biodiesel production is discussed with the students (to deepen knowledge on the topic, refer to sources such as:https://bit.ly/2XEwmVo, https://bit.ly/38Jr3u0 e https://bit.ly/3su2pFy); from a sustainability perspective, as an alternative to the use of fossil fuels. Questions such as the following are formulated:
-
What is it made of?
-
How is it produced?
-
What is its socioeconomic impact?
-
What are its advantages and disadvantages?
After the discussion, a laboratory activity is carried out to produce biodiesel from used cooking oils, following the established protocol (see Student Guide).
Student profiles
Essential learnings
Please download the following files:
Activity guides
Activity Introduction
The issue discussed in the previous activity is connected to the fact that fossil fuels are non-renewable resources, as they require millions of years to form and the existing amount on Earth will only last for a few decades or, at best, a few hundred years.
Next, the process of fossil fuel formation (particularly oil) over the course of the geological eras is explained and related, by watching the following video:
Historical and Temporal Exploration of Oil Formation
The historical and temporal exploration of oil formation may include information such as:
-
70% of today’s oil deposits were formed during the Mesozoic Era (between 252 and 66 million years ago);
-
20% were formed during the Cenozoic Era (around 65 million years ago);
-
10% were formed during the Paleozoic Era (between 541 and 252 million years ago).
The introduction of this information can be related to the International Chronostratigraphic Chart and represented in the timeline to be created and presented at the end of the project.
The importance of fossils as key elements in reconstructing Earth’s history is addressed, and the concept of a Geological Era is introduced. Notable examples from each historical period are explored.
The class is divided into 5 groups, and each is assigned a chronostratigraphic unit to research: Precambrian, Paleozoic, Mesozoic, Cenozoic, and Holocene. Students are informed that the working groups will remain the same throughout the school term for the completion of various tasks.
Activity Development
Over the course of the school term, students carry out a set of tasks to explore the topic, in the order presented below, following a student-centered approach monitored by different teachers (Natural Sciences, Biology, Physics and Chemistry, Mathematics, ICT), who provide all the necessary materials (computers, experimental tools, video production equipment, etc.).
Task 1 – Research on Each Assigned Theme (Eon/Era/Epoch)
Each group researches, selects, and discusses relevant information on their assigned topic using computers and the internet, textbooks, and other resources. To support this task, a Student Guide (Student Guide – section 2) is provided. Teachers monitor each group’s work, helping with doubts, questions, explanations, and research suggestions.

This task is considered complete once all research is validated, relevant information (words) is selected, and texts, sentences, and images to be used in the timeline are prepared.
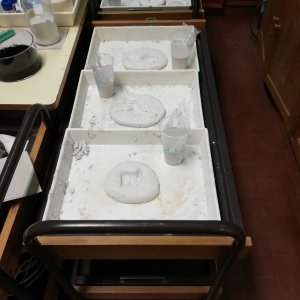
Task 2 – Fossilization Simulation with Plaster
To study the importance of fossils and gain better knowledge of the planet’s history, a practical experimental activity is carried out according to the Student Guide (section 3).
During the activity, the concept of fossilization is explored, linking it to the formation of sedimentary rocks and reinforcing this with textbook content.
The students’ work will be displayed on the “Talking Wall” and used later when presenting the timeline to explain the fossilization process(es).
Task 3 – Fossil Observation and 3D Printing
After completing the previous task and allowing time for the “fossilization” of the created objects, students open their plaster molds to observe the results.

The characteristics and dating of fossils related to each group’s assigned stratigraphic units are discussed.
Students then research and select fossils for 3D printing using open-license 3D model sources (e.g., https://morphosource.org).
Finally, each group prints a 3D model (for example, a trilobite).
Task 4 – Formative Assessment
To assess student learning and validate the information to include on the timeline, each group completes an activity from the Student Guide (section 4). The activity is done in groups, and then the teacher reviews the answers with the whole class.
This task results in the sentences to be included in the timeline, which will become the “Talking Wall.”
Task 5 – Video Production
Using the texts produced in Task 1 (and validated in Task 4), students prepare a video presentation about their assigned topic. The video should cover all relevant information and serve as an autonomous communication tool on the “Talking Wall”—it will be projected/played whenever someone interacts with a nearby device.
All students must participate in the video’s production, each presenting part of the researched information and contributing to the video design (editing with software like Adobe Premiere Pro to cut footage, add images, and assemble the final version).
The teacher’s role is to record and guide students’ performances to ensure the final product’s quality (sound, image, relevance, communication style, clarity, sequence, etc.) and assist in editing.
Task 6 – Collage and Timeline Installation on the Wall
As the maker component is essential, students are encouraged to actively participate in building and installing the timeline and materials on the chosen wall.

Basic materials and tasks for the timeline construction:
-
Cut k-line boards
-
Print and glue images, words, and sentences
-
Apply aluminum tape to the wall for conducting electricity (for use with Makey Makey)
-
Connect the Makey Makey to a laptop running a Scratch program. The Scratch file can be created by the teacher using audio from the students’ videos, to be triggered automatically when buttons on the “Talking Wall” are pressed
-
Set up a floor projector with interactive capabilities, connected to a laptop running Scratch. The teacher may also prepare this Scratch file with students’ videos for automatic playback
-
Print QR codes for each topic, providing written info (important dates, major events, etc.)
-
Display 3D printed fossils and simulations alongside the “Talking Wall”
As an example of a potential final product, see the image in the “About the Activity” section.
After selecting the wall, calculate the scale to be used for the timeline. A 5-meter-long wall with two presentation levels is suggested (see the “About the Activity” section for reference).

Activity Conclusion
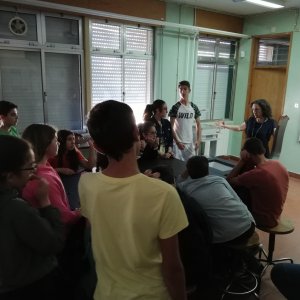
Task 7 – “Talking Wall” Presentation
The project culminates in a public presentation of the “Talking Wall” by all students to various audiences:
-
Students from the same grade
-
Students from a lower grade
-
Teachers from different levels and subject areas
-
Parents/guardians and the educational community

Each group presents their work displayed in various forms (images, texts, words) on the wall.
Videos produced by students
Essential learnings
Evidence / Student action
- Explicitar os princípios do raciocínio geológico e de datação relativa e reconhecer a sua importância para a caracterização das principais etapas da história da Terra (eras geológicas).
- Tarefas 1 e 3
- Relacionar o ambiente geológico com a saúde e a ocorrência de doenças nas pessoas, nos animais e nas plantas que vivem nesse ambiente, partindo de questões problemáticas locais, regionais ou nacionais.
- Tarefa 7
- Explicitar a importância do conhecimento geológico para a sustentabilidade da vida na Terra.
- Tarefa 7
- Identificar técnicas para separar componentes de misturas homogéneas e heterogéneas e efetuar a separação usando técnicas laboratoriais básicas, selecionando o material necessário e comunicando os resultados.
- Tarefa 2
- Resolver problemas utilizando equações e funções, em contextos matemáticos e não matemáticos, concebendo e aplicando estratégias para a sua resolução, incluindo a utilização de tecnologia, e avaliando a plausibilidade dos resultados.
- Tarefa 6
Cohen, K. M., Harper, D. A. T., & Gibbard, P. L. (2017). ICS International Chronostratigraphic Chart (Iberian Portuguese) 2017/02. International Commission on Stratigraphy, IUGS. Acedido em 4 de abril de 2019 em https://stratigraphy.org/chart
Protocol for Biodiesel Production from Used Cooking Oils
Introduction
Although they are considered non-hazardous waste, cooking oils discharged into wastewater drainage systems clog the grease filters found in Wastewater Treatment Plants (WWTPs), hindering their proper functioning.
However, reusing frying oils allows for:
-
obtaining a derivative that, when mixed with diesel, serves as fuel for, for example, cars – biodiesel;
-
using biodiesel directly as fuel in diesel engines;
-
making soap;
-
reducing the import of petroleum products;
-
reducing the emission of polluting particles from diesel engine exhausts.
Materials and Reagents
-
Coffee filter
-
Used cooking oil
-
Methanol
-
Sodium hydroxide
-
Vinegar
Procedure
Cleaning the used oil
-
Heat approximately 250 ml of used cooking oil to around 40 °C.
-
Filter the hot oil using a coffee filter.
-
Heat approximately 200 ml of filtered cooking oil to around 110 °C to remove any water present.
-
Let the oil cool to a safe handling temperature.
Biodiesel Preparation
-
Measure 200 ml of filtered oil in a graduated cylinder.
-
Weigh 5 g of sodium hydroxide for each liter of oil.
-
Using a graduated cylinder, measure 300 ml of methanol per liter of oil.
-
Add the methanol to the sodium hydroxide and dissolve it completely, then seal the container.
-
Heat the cooking oil to a temperature between 54 °C and 58 °C, add the sodium methoxide solution to the heated oil, and stir for 40 minutes.
-
Let the mixture rest for a day and separate it by decantation using a separating funnel.
Biodiesel Washing
-
Measure the pH of the biodiesel.
-
If the pH is above 7, add a few drops of vinegar (which contains acetic acid) to the washing water.
-
Add water (with vinegar if necessary) to the biodiesel (about 30% of the volume of oil used) and shake.
-
Let it rest for a day and separate.
-
Repeat the washing process until a clear product is obtained.
Guidelines for Group Work on Eras, Eons, and Epochs
The following guidelines are a basis for the development of your group work, which will culminate in the construction of a scaled chronological timeline on a school wall.
Each group should research information from different sources (books, school textbooks, internet) about the assigned Era, Eon, or Epoch, highlighting aspects such as:
-
main events;
-
representative species;
-
events marking the end of the Era, Eon, or Epoch;
-
identification of fossils found in each Era, Eon, or Epoch.
The group working on the Holocene may consult the following information sources to write about the present day:
-
https://www.publico.pt/2019/05/28/p3/noticia/malasia-morreu-o-ultimo- rinocerente-de-samatra-macho-1874410
This group must also create 4 to 5 sentences that will serve as the basis for the production of “speech bubbles” to be used as support for photographic records on the day of the presentation of the “Talking Wall.” These should contain short phrases or keywords related to the Sustainable Development of the planet. For example: “Think about the planet’s future — act today!”
The focus of this group should be on the challenges the planet faces and the current dangers we are experiencing.
All groups must:
-
Select and collect illustrative images, recording their sources;
-
Create phrases (maximum two lines) to place on the timeline;
-
Write short texts to serve as a “script” for the video recordings to be made.
Fossilization Process Simulation
As you know, fossils are remains of living beings or records of their activity preserved in various materials. This preservation mainly occurs in rocks, but it can also happen in sediments at the bottom of seas and lakes, in ice, in resins, etc.
The most common examples are bones, plants, shells, eggs, and fossilized footprints.
The preservation of organic matter and delicate skeletal remains — since these decompose and are quickly destroyed — requires uncommon fossilization conditions, which occur very rarely.
Adapted from https://pt.wikipedia.org/wiki/F%C3%B3ssil
In this activity, you will simulate the process of fossilization through two different methods, using various materials:
-
Plaster
-
Water
-
Cling film (plastic wrap)
-
Dried leaves or sand
-
Object (e.g., a small animal toy that fits in the cup)
-
Container (plastic cup)
-
Stirring stick
-
Dropper or squirt bottle
-
Tray
-
Calcium carbonate to simulate rock material
-
Chisel
-
Hammer
Each group member must actively participate in carrying out the experimental activities.
Experimental Activity 1
-
Label the cups
-
Pour in water
-
Add plaster
-
Mix using the stirring stick
-
Wrap the object in cling film
-
Place it in the cup until it is submerged
-
Wait the necessary time for the water to evaporate
Note: Wrapping the object in cling film helps with its removal in the second part of the activity.
Prediction:
What do you think will happen when the object is removed?
After one week, remove the object by carefully breaking the plaster in half (damaging the impression as little as possible).
Conclusion:
What can you conclude from your observations in this experimental activity?
Experimental Activity 2
-
Mix water with plaster/modelling clay thoroughly
-
Shape a mold approximately the size of the object
-
Wrap the object in cling film
-
Press the object into the mold
Conclusion:
What can you conclude from your observations in this experimental activity?
Activity on Major Events in Earth’s History Since Its Origin
-
Carefully read the following historical events, and using the table presented in question 1.1, match each event to the corresponding moment in Earth’s history.
Events:
A) The ozone layer forms
B) The solar system forms
C) Number of species rapidly increases
D) Atmospheric oxygen levels spike
E) Eight planets form, including Earth
F) Amphibians colonize various habitats
G) Unicellular life invades land
H) Earth’s oceans form
I) The supercontinent Pangaea forms
J) Unicellular life appears
K) Multicellular life appears
L) The supercontinent Pangaea breaks apart
M) Photosynthesis begins
N) The Great Extinction
O) First dinosaurs appear
P) Microorganisms begin using oxygen
Q) Greenhouse effect leads to warming and melting
R) Age of dinosaurs
S) Different species of hominids coexist
T) Modern plants and animals appear
U) Dinosaurs go extinct
V) Homo sapiens dominates the planet
W) Homo sapiens appears
X) Hominids use stone tools
Y) Hominids walk upright
Z) Age of Mammals begins
1.1 Record the above historical events in the corresponding spaces provided.
|
Historical Events/Occurrences |
||
|
Eon |
Precambrian |
|
|
Era
|
Paleozoic |
|
| Cenozoic | ||
| Mesozoic | ||
|
Epoch |
Holocene |
|